
Hi and Welcome to the documentation of Bulk Clone Proffessional Cloud for Jira
On the following pages we will guide you through the setup and usage of this plugin, and you will see how easy it is to get started and how intuitive the plugin is to use.
The documentation contains of the following chapters;
- Installation of the plugin
- Setup of the plugin
- Usage of the plugin
If you have support questions drop us a note here
Check Release Notes on Atlassian Marketplace for specifics.
Installation of the Plugin
- Log into your JIRA instance as an admin.
- Click the admin dropdown and choose Add-ons. The Manage add-ons screen loads
- Click Find new add-ons from the left-hand side of the page.
- Locate Bulk Clone Proffessional for Cloud via search. Results include add-on versions compatible with your JIRA instance
- Click Try free to begin a new trial or Buy now to purchase a license for Bulk Clone Proffessional for Cloud. You’re prompted to log into MyAtlassian. Bulk Clone Professional begins to download.
- Enter your information and click Generate license when redirected to MyAtlassian.
- Click Apply license. If you’re using an older version of UPM, you can copy and paste the license into your JIRA instance.
- You’re all set! Click Close in the Installed and ready to go dialog.
Setup of the plugin
The configuration and setup of the plugin is very simple to accommodate and basically follow the same scheme as the built in Jira bulk operations
Default Settings – “Jira Administrator” and “Jira System Administrator” always has global access to Bulk Clone in all instances, all others must apply generic Jira Bulk Operation privileges;
- Global “Bulk Change” operational rights (Found under Administration|System in Jira)
- “Create Issue” permission for the Jira project(s) you are cloning from. (Check Jira Project’s permission scheme)
- “Create Issue” permission for the Jira project(s) you are cloning to. (Check Jira Project’s permission scheme)
Special Permission Settings
If you have users that has no “Create_Issue” permission for the source project(s) you are cloning from (assumes that the same users have Create Issue permission to the target project(s) they intend to Bulk Clone to), then you have the possibility to add a “bulk-clone-pro-users” Group and then add the users to it. Bulk Clone can then clone without problem if even if the users has only Read Only rights to the source project(s). This is particular useful for instance if you have a “template project” which you want to Bulk Clone from, but want to protect the content of this project not to be altered accidentally by your users. You also need to alter your permission scheme for the source project(s), disabling the users to carry out the “Create_Issue” operation for it to take effect.
Usage of the plugin
Once you have configured the setup of the plugin as described above, it is now time to go to action and use it.
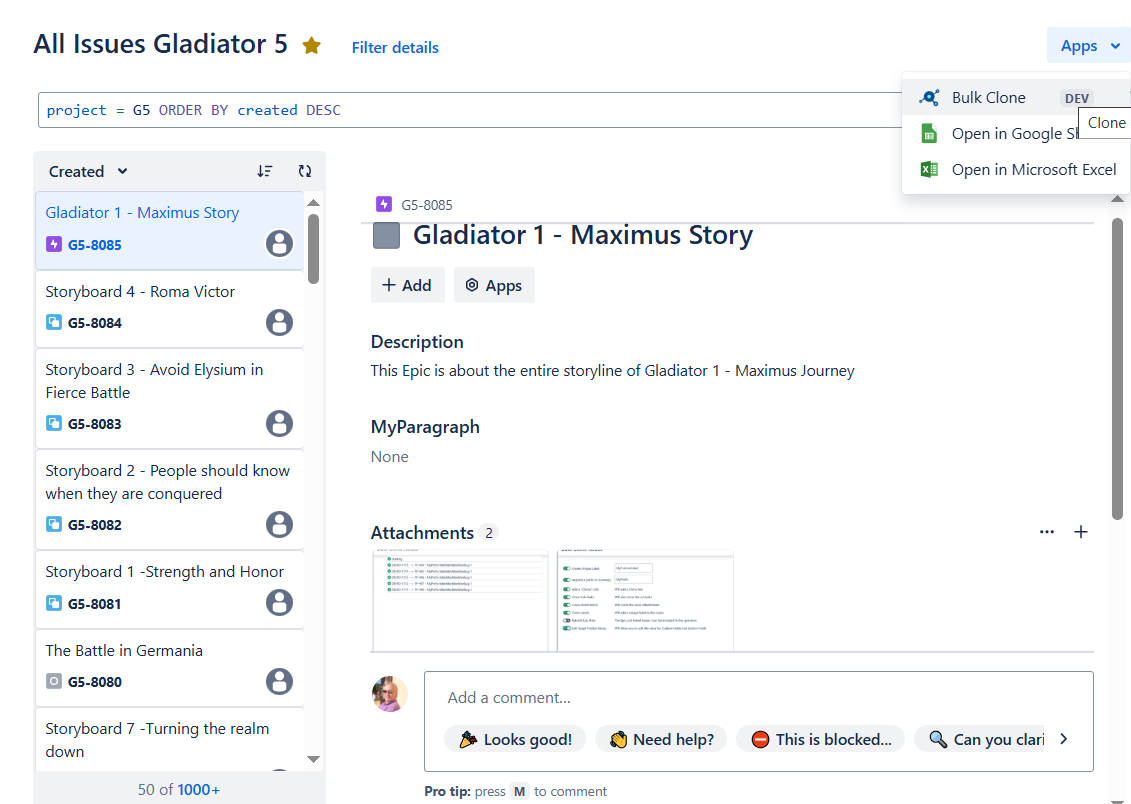
- From Jira: Go To: “Search for Issues” menu to query the result-set you want to clone, alternatively click on existing saved filter.
- Once the result set for the JQL builder is shown you can then choose “Bulk Clone” on the Apps Menu. (Ensure that you have user rights for this menu choice)
- The listings should look like the screenshot below;
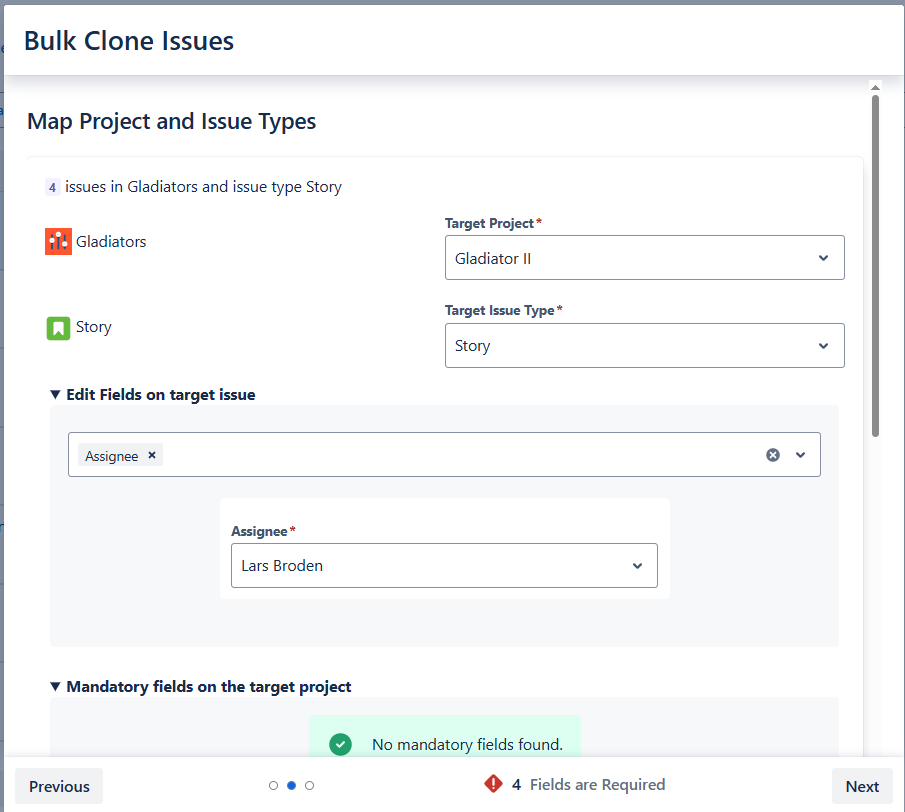
- You are directed to the Bulk Clone main screen, This is where you set your Bulk Cloning Options

- “Add Label” Choice is mandatory, this is a prerequsite that you will be able to find all your cloned issues afterwards
- “Add Clones Link” – Adds a “Clone Link” to the original issue
- “Clone SubTasks” – Also includes all subtasks associated to a parent issue.
- “Clone Attachments“- Any attachement to either Parent issue types or SubTask issue types gets cloned. For SubTask Issue Types, “Clone Subtasks” option need to be choosen
- “Clone Labels” – Clones any previously set labels on the issues, both for parents and subtasks
- “Rebuild Epic Links” – checkbox allows you to included/exclude a preservation of link relationships between the issue type Epic and its associated User Stories (associated through the Epic Link Field) if an Epic is also cloned. It includes that the Epic and its associated stories are included in the JQL Query as in this example;
- Epic/Child BulkCloning – (“Epic Link” Relationship)
-
- In native Jira JQL;
-
project = GLAD and “parent” in (GLAD-1, GLAD-2, GLAD-3, GLAD-4, GLAD-5) or Issuekey in (GLAD-1, GLAD-2, GLAD-3, GLAD-4, GLAD-5)
-
- “Rebuild Parent Links” – Allows you to included/exclude a preservation of link relationships between the Jira Portfolio parent issue type and its associated child issues (Most commonly Business Epics–>Features–>Stories) common in most Enterprise agility setup’s like the Scaled Agile Framework, here is an example on how to clone these hierarchies; (Note: for some of these examples it requires 3rd party plugins like ScriptRunner to be installed)
-
- Parent/Child Bulk Cloning (“Parent Link” Relationship)
-
- In native Jira JQL
-
project = GLAD and “parent” in (GLAD-11, GLAD-23, GLAD-33, GLAD-43, GLAD-53) or Issuekey in (GLAD-11, GLAD-23, GLAD-33, GLAD-43, GLAD-53)
-
- Parent/Child Bulk Cloning (“Parent Link” Relationship)
- “Edit Target Field Values” – Allows you to include/exclude editing of output values of Jira’s system & custom fields. You can select a free number of fields to alter the output for. Any mandatory fields will also be autodetected here.
- Epic/Child BulkCloning – (“Epic Link” Relationship)
Once youre done with your Bulk Clone settings, press “Next”. Here you can configure field settings and set values for “mandatory” fields and/or redirect any issue type to a different project(s) or even change one issue type to another
-
- You can also configure Field settings for Subtasks and/or redirect subtasks to a different project(s)
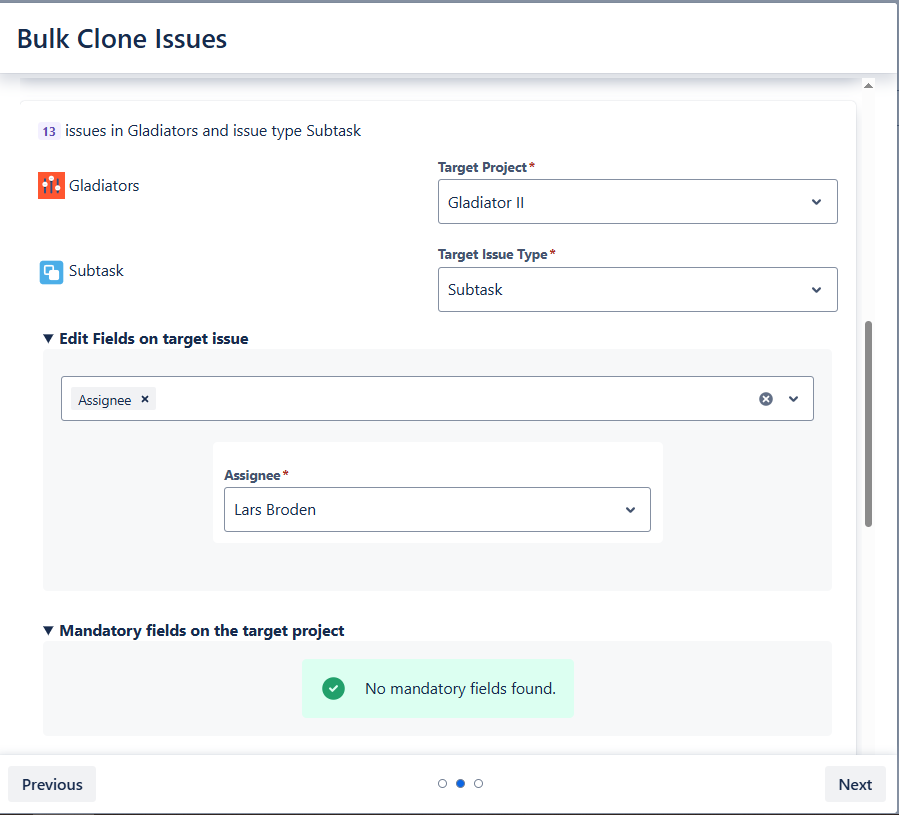
- Once all field configurations are set we are ready to to Bulk Clone, but first a final Confirmation prior to Bulk Cloning which looks like this;
- You can also configure Field settings for Subtasks and/or redirect subtasks to a different project(s)
-
- If you are happy with your set options and field configurations, press “Start Cloning” and the Bulk Cloning operation starts
- You are prompted with the current status progress screen during Bulk Cloning;
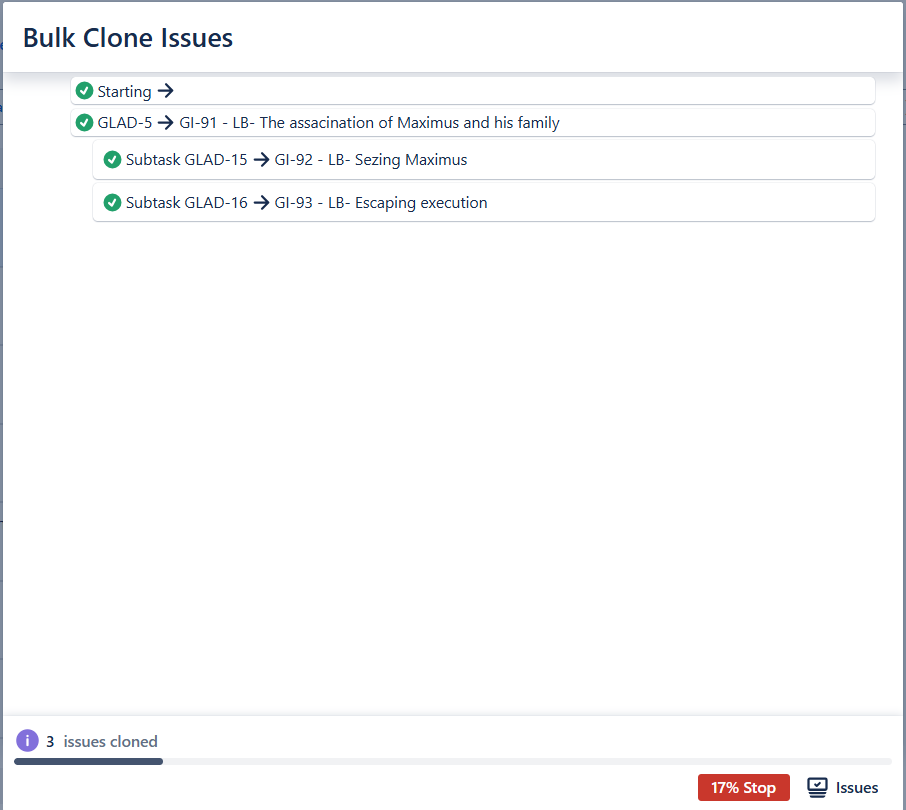
- Once completed, press the “Acknowledge” button to list the outcome of the Bulk Cloning operation
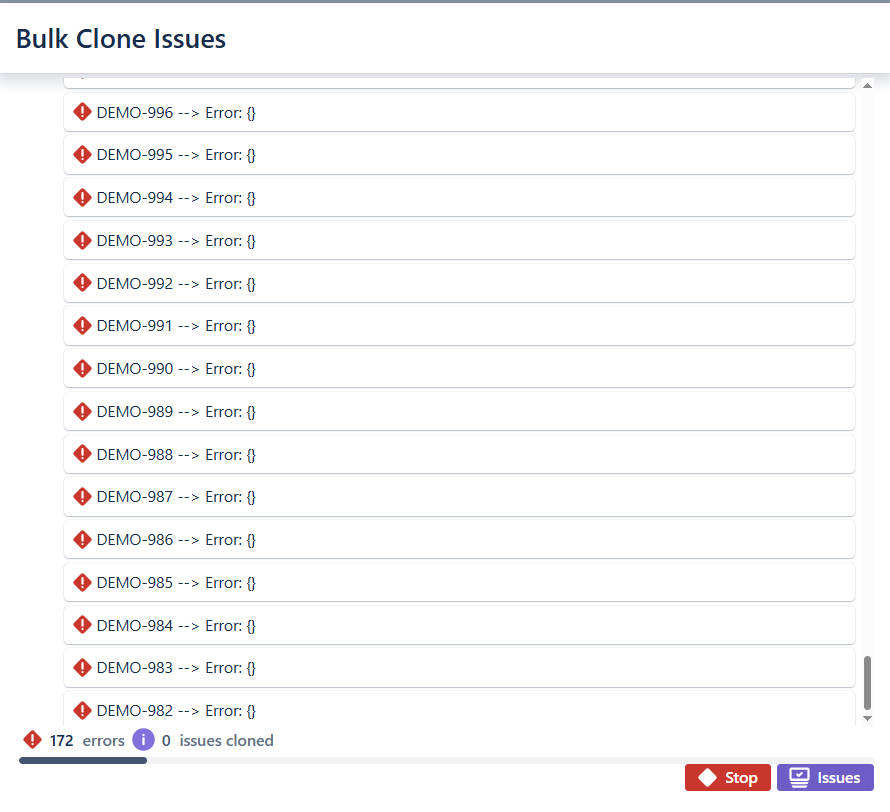
Error handling during Bulk Cloning
- Sometimes you can encounter errors in the Bulk Cloning operations and issues cannot be created and moved. This is due to how you have configured values and permissions in your project(s). If an error is encountered while trying to attempt Bulk Cloning and Error Screen is shown with the failed clones, it looks like this
- You have now gone through a complete Bulk Cloning Operation, its not more complex than this.
Happy Bulk Cloning
Bulk Clone APPS Team

We offer professional services within Software Management, Enterprise Agility, Process Engineering, & Tooling. We also offer commercial IT add-ons for Workflow Management Products

We have extensive worldwide experience in countries such as United Kingdom, Germany, United States, France, Sweden, Denmark and others